INSTRUCTIONS: How to set up and verify the Google Search Console service
See the article below for instructions on how to gain access to the Google Search Console.
Google Search Console in Brief
The Google Search Console is a tool for getting information about how Google interacts with your site within an organic search. An SEO specialist needs to know whether pages are properly indexed, whether the Google robot can load and interpret content correctly, whether some pages do not have a problem with speed, how individual pages are ranked in the search, on what keywords, what is the click-through rate and a lot of other information. He/she will find this data in the Google Search Console, which is one of the key tools for the success of a SEO campaign.
Setting up account in the Google Search Console
- To set up an account in the Google Search Console service, visit https://search. google.com/search-console/about.
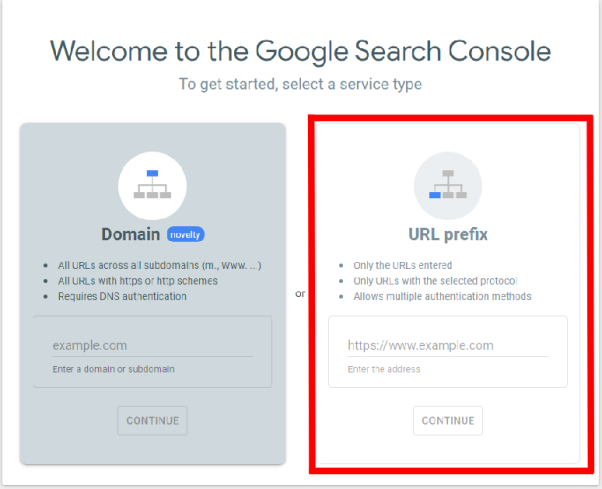
- A selection of two service types appears on this page. In these Instructions, we'll focus on the Předpona adresy URL/URL Prefix option. Select this option and enter the URL of your sites, including the http or https protocol (http://youraddress.com/ or https://youraddress.com/), and click POKRAČOVAT/CONTINUE.
Verifying the domain ownership
- In the second step, it is necessary to verify that you really own the domain. There are several options for verifying ownership.
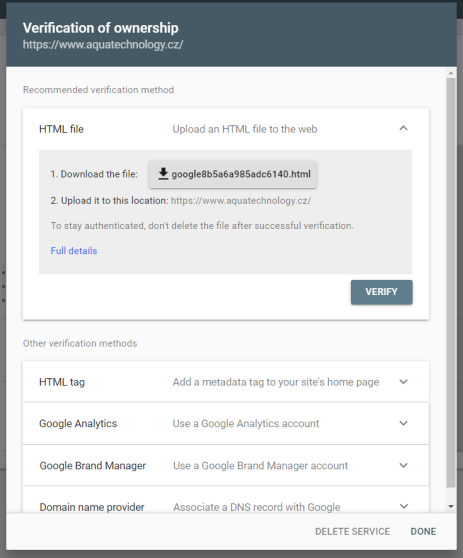
Google Search Console ownership verification options
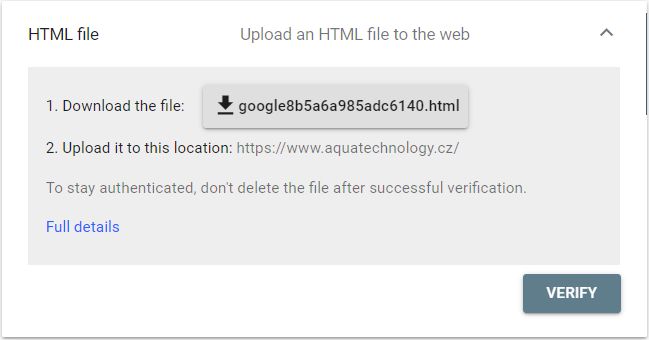
- Soubor HTML/HTML file - This is usually the recommended method from Google, which requires uploading an HTML file to your site. If you have the necessary knowledge, you can upload the file to the site yourself or ask your programmer. Otherwise, select one of the other methods.
- Značka HTML/HTML tag - For this verification method, you'll need to copy the meta tag and paste it into the section of your site's source code. As in the previous case, you need to have some knowledge or a programmer available who will do it for you. Once pasted, click the OVĚŘIT/VERIFY button and you're done.
- Google Analytics - In this case, you must already have Google Analytics set up on your site and have permission to edit that service for that site. Then just click on the OVĚŘIT/VERIFY button and wait for the message to verify the authentication.
- Správce značek Google/Google Tag Manager - In this case, this is verification via the Google Tag Manager (GTM), and you must have the GTM tracking code located on your site. Again, this is verification with little intervention in the HTML code.
-
Poskytovatel názvu domény/Domain Name Provider - For this verification, you'll need to log in to your domain provider account and add a text record, which Google will then verify.
Google Search Console verification for WordPress
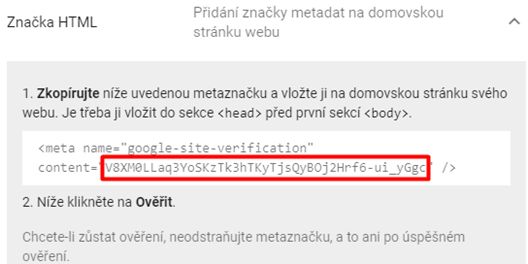
If you don't have it yet, install the Yoast SEO plug-in. Verification is easy. Select HTML TAG as the verification method and copy the part of the HTML tag that is in the meta tag quotes after content=.
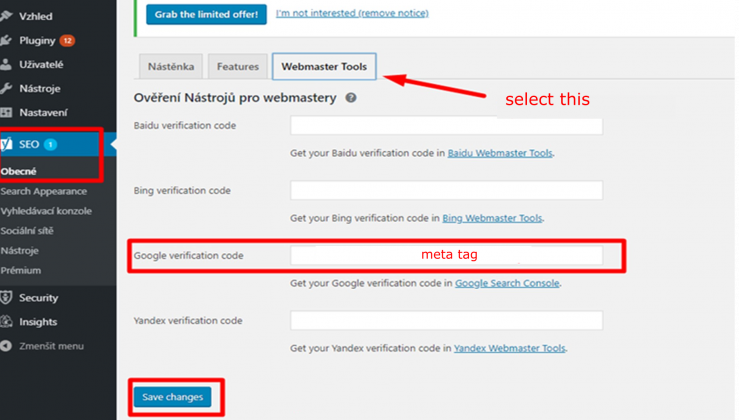
Then in the WordPress administration, select the SEO folder in the left menu, click on the Webmaster Tools tab and paste a part of the copied meta tag into the Google verification code field. Be sure to save your changes. Then click OVĚŘIT/VERIFY on the GSC verification page. If everything went well, a successful verification message will appear.
Google Search Console verification for Shoptet
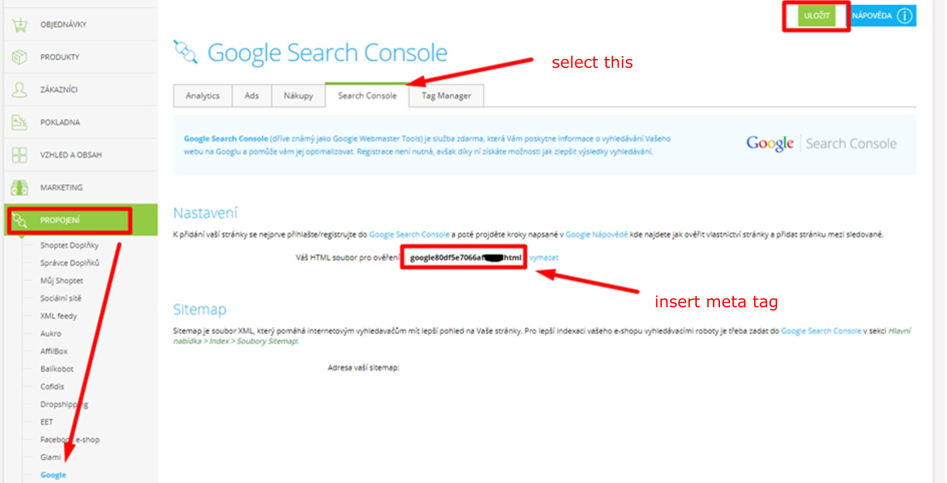
Verifying the Google Search Console in the Shoptet is also easy. Select HTML TAG as the verification method and copy the part of the HTML tag that is in the meta tag quotes after content =.
Then in the Shoptet administration, select the PROPOJENÍ/LINK folder in the left menu, click on the Google tab, select the Search Console tab and paste a part of the copied meta tag into the Your HTML file field for verification. Be sure to save your changes. Then click verify on the GSC verification page. If everything went well, a successful verification message will appear.
FINAL TIP: Whatever method you choose, be sure to click the OVĚŘIT/VERIFY button.

SHARE THE ARTICLE
TAGS

